My main machine at home is a 2015 MacBook Pro that is starting to show its age. I run Windows on Parallels to work in Visual Studio when necessary, but I prefer to stay in macOS as much as possible for performance reasons.
This post focuses on the steps I took to get my local development environment on macOS up and running to write a few Azure Functions.
Step 1 – Install SDKs
The two SDK prerequisites to writing Azure Functions on macOS are to install the .NET Core runtime and the Azure Functions Core Tools.
Installing the .NET Core SDK is a simple matter of downloading and running the installer on your Mac. If it’s already installed, make sure that it’s the latest bits by running the dotnet --version command from a Terminal window.
The Azure Functions Core Tools are best installed via Homebrew. If you’ve never heard of Homebrew, it’s the best tool for installing software packages on macOS. You can install it by following the instructions here. With that done, you can follow the instructions on Microsoft Docs to install the Core Tools.
Step 2 – Get VSCode and related extensions
My favourite editor for .NET on the Mac is Visual Studio Code. I’ve tried Visual Studio for Mac and JetBrains Rider and always end up back in VSCode due to its simple yet extensible development model.
You don’t need any extensions per se to develop Azure Functions, but the Azure Functions extension has a few tricks up its sleeve that come in handy:
- It creates Tasks for building, running, and debugging functions locally.
- It provides Intellisense for function-specific files such as local.settings.json or host.json.
- It ensures that your Core Tools are always up to date.
- It’ll even let you deploy a Function App directly to Azure (avoid doing this for production scenarios).
Check out my top 5 extensions for NET Core development if you’re just getting familiar with VSCode.
Step 3 – Runtime Storage Emulation
There’s one last step to take care of before getting to the code, and that’s Storage Emulation. You’ll need storage emulation for functions that use queue, table, file, or blob storage. The Azure Storage Emulator was designed for this purpose on the Windows side, but it isn’t available for the Mac.
There is however an open source software called Azurite that does much the same as Storage Emulator. The only feature that it lacks as of the time of writing is support for Azure File Storage. It’s owned by the Azure team and is available on GitHub for anyone to contribute.
Azurite is installed via npm with the following command:
npm install -g azurite
I had some issues getting the latest version of Azurite (2.7) running on my computer. The root cause is related to the Windows-style line endings in the node packages that causes it to spit out the following error on macOS:
'node\r': No such file or directory
The solution I chose was to revert to version 2.6.5, which worked like a charm. Another way to resolve the issue is to convert the files in the package to Linux-style line endings, but since I didn’t need any of the features in the latest version, I chose the quicker path.
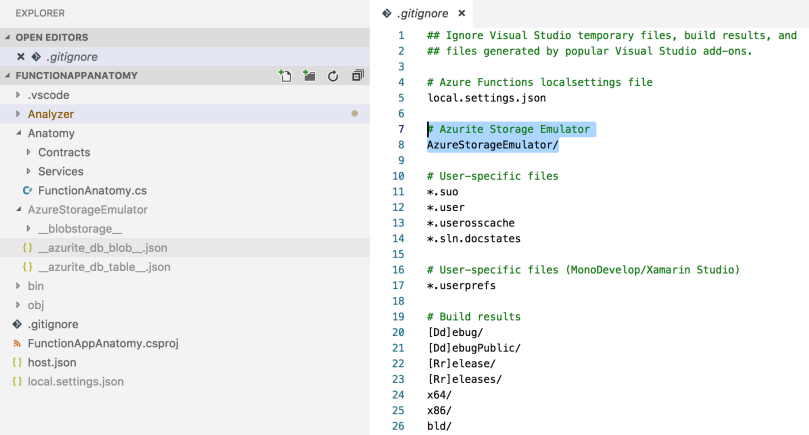
Azurite creates a few files to store data in a folder of your choice when launching it. My approach has been to create an AzureStorageEmulator folder in my project, and adding it to the .gitignore file. This way the data stays with the project, but isn’t committed to source control.
The last step to using Azurite is to set the value of the AzureWebJobsStorage key in local.settings.json to UseDevelopmentStorage=true. With that done, any functions that are triggered by an event on a queue or blob will react to those events.
Step 4 – Write Those Functions
At this point, you should have everything needed to develop Azure Functions on the Mac. You can build, run and debug functions, and any functions that need to write to queues, table, or blob storage can do so by calling the same APIs that would be used with real resources deployed on Azure.
So far I’ve found the experience of working with Azure Functions on the Mac simple to work with, if a bit rough around the edges when it comes to storage emulation. I’ll make sure to come back and update this article with any other hiccups that I run into along the way.
